

From search results to your phone’s news feed to social media ads to video streaming recommendations, you’ve no doubt encountered personalization in action and likely benefited from it. Personalization is something you run into more and more, and that’s because it’s effective.
Amazon Personalize is a service that provides personalization services for your application. As AWS describes it, “Amazon Personalize enables developers to build applications with the same machine learning (ML) technology used by Amazon.com for real-time personalized recommendations – no ML expertise required.”
With Personalize, you can create recommendation systems quickly, and provide quality recommendations to your users in real-time.
You can use Personalize from a broad spectrum of applications including web sites, mobile/desktop apps, and email/SMS marketing systems.
Services provided by Personalize include product recommendations, product ranking, and customized direct marketing.
Personalize has these notable features:
• Recommenders: get personalized recommendations for a user, such as “top picks for you” or “because you watched x”.
• User segmentation: discern segments of users, such as gauging interest in different product categories or brands.
• Automated machine learning: Personalize trains ML models by inspecting your uploaded data.
• Real-time recommendations: as user intent changes, so do Personalize’s recommendations.
• New user recommendations: generate recommendations for new users even when there is no interaction history.
• Similar item recommendations: offer similar items to your users.
For most use cases, Amazon Personalize generates recommendations primarily based on item interaction data. Item interaction data comes from your users interacting with items in your catalog. For example, users clicking different items. Your item interaction data can come from both your historical bulk interaction records in a CSV file, and real-time events from your users as they interact with your catalog. In some cases, Amazon Personalize also uses data from items and users such as genre, price, or gender. And for next best action scenarios, it uses actions and action interaction data.
How it works
Amazon Personalize uses your data to train domain-based or customizable recommendation models. You use a private recommendation API in your application to request real-time recommendations. Amazon Personalize also supports batch workflows get item recommendations and user segments.
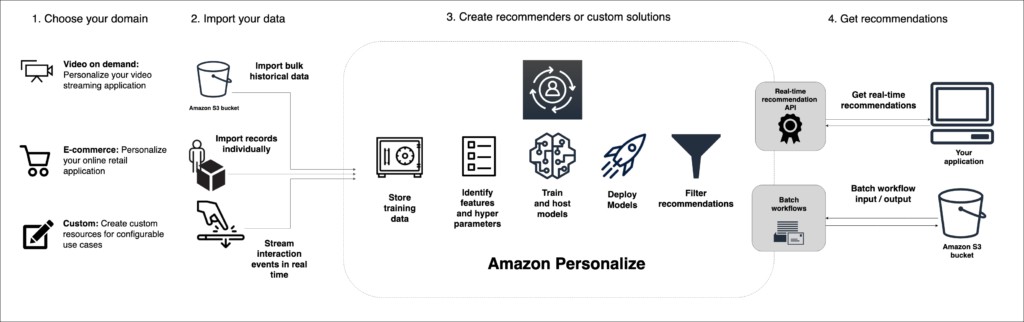
To create a recommendation system, you follow these steps:
- Choose your domain. You can choose e-commerce, video on demand, or create a custom domain.
- Import your data. Upload your data to S3 and import it to train a model. That includes user-item interaction data, and optionally user data and item data.
- Generate recommenders, solutions, campaigns, and event trackers: You configure and generate a variety of artifacts to make ML models trained with your data available for application use.
- Get recommendations: Use your recommendation system, retrieving personalized user recommendations and sending user events in real-time to keep your interaction data up-to-date.
Datasets
- At minimum 1000 item interactions records from users interacting with items in your catalog. These interactions can be from bulk imports, or streamed events, or both.
- At minimum 25 unique user IDs with at least two item interactions for each.
For quality recommendations, we recommend that you have at minimum 50,000 item interactions from at least 1,000 users with two or more item interactions each.
If you create a Domain dataset group, each dataset has additional requirements depending on domain. If you aren’t sure what type of data you need, we recommend creating a Domain dataset group and using the default schemas for your domain as a guide.
Schema
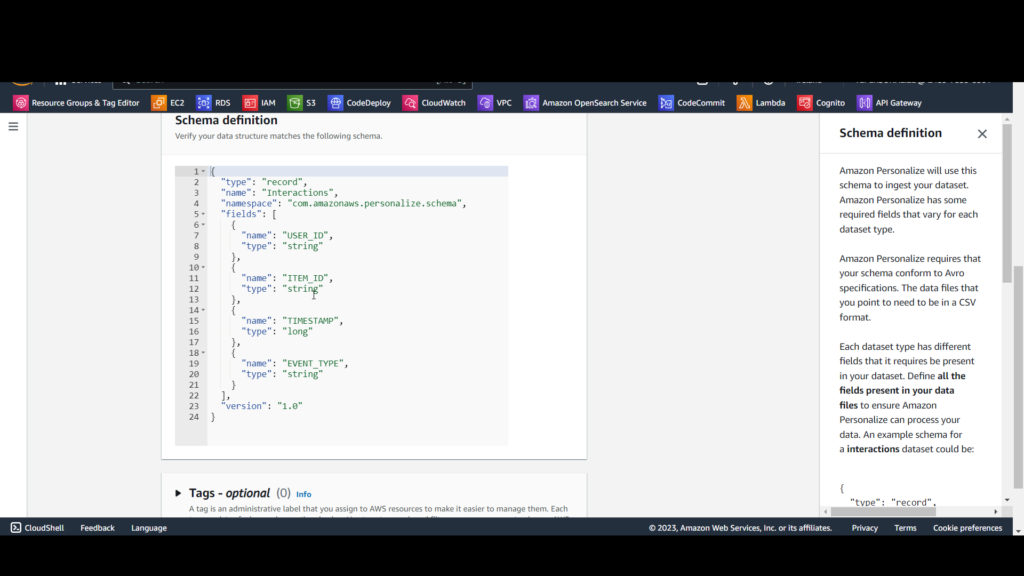
A schema tells Amazon Personalize about the structure of your data and allows Amazon Personalize to parse the data. A schema has a name key whose value must match the dataset type. After you create a schema, you can’t make changes to the schema.
Schema data types
Amazon Personalize schemas support the following Avro types for fields:
- float
- double
- int
- long
- string
- boolean
- null
{
"name": "GENDER",
"type": [
"null",
"string"
],
"categorical": true
}
The AWS Free Tier gives you 2 months use of Amazon Personalize for free.
Concepts
Let’s review some Personalize concepts and terms:
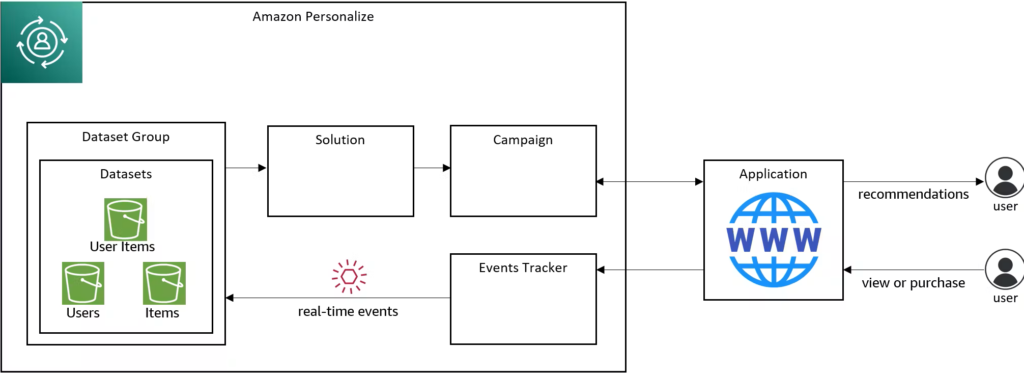
A recipe is a pre-configured algorithm. User personalization recipes can predict what a user will interact with. Related items recipes can find items similar to an item a user is interested in, or rank items based on predicted interest.
A solution is a combination of a recipe, parameters, and one or more solution versions.
A solution version is a trained machine learning model you can deploy to get recommendations for customers.
A campaign is a deployed solution version. We can invoke the campaign from our application to get recommendations.
An event tracker lets us report new events into the interactions dataset, such as a user watching a video or purchasing an item. We train our recommender with existing historical data, but as our application is used, we need to keep that data current. We do that by reporting user events via an event tracker.
Our Hello, Personalize Project
We will configure Personalize for personalized movie recommendations. We’ll be spending time in the AWS console uploading data to S3, creating artifacts in Amazon Personalize, training a model with the data, and deploying a campaign. After that we’ll get personalized movie recommendations based on user Id. We’ll also report user movie watch events to Amazon Personalize to show how the interaction data can be kept up to date with new user activity in real-time.
One-time Setup
For any of the tutorials in the Hello, Cloud series you need the following:
An AWS account, and an understanding of what is included in the AWS Free Tier.
Step 1: Create S3 Bucket and IAM Service Role in the AWS Console
The S3 bucket is where training data will be uploaded. The service role and policies will allow Amazon Personalize to access the S3 bucket.
In this step, you’ll create an S3 bucket plus IAM policies and a service role for Amazon Personalize.
Note: if you have Block Public Access active for S3, Amazon Personalize will not be able to access your S3 bucket.
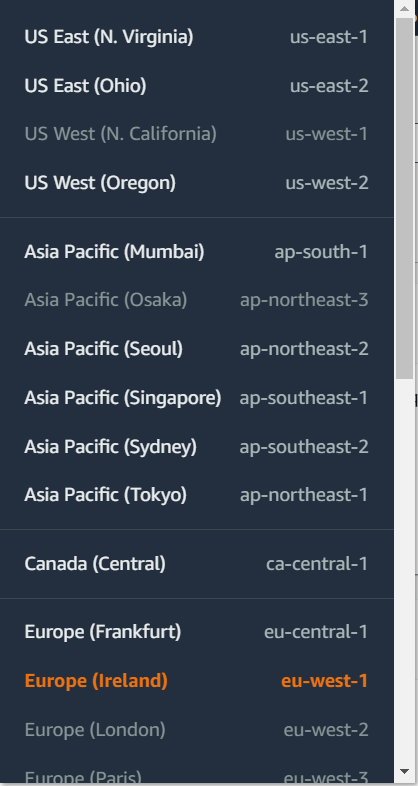
Sign in to the AWS management console. At top right, select the region you want to work in. You can check supported regions for Amazon Personalize on the AWS Regional Services page. I’m using eu-west-1 (Ireland).
- Navigate to Amazon S3. You can enter s3 in the search bar,.
- Click Create bucket and enter/select the following to create an S3 bucket:
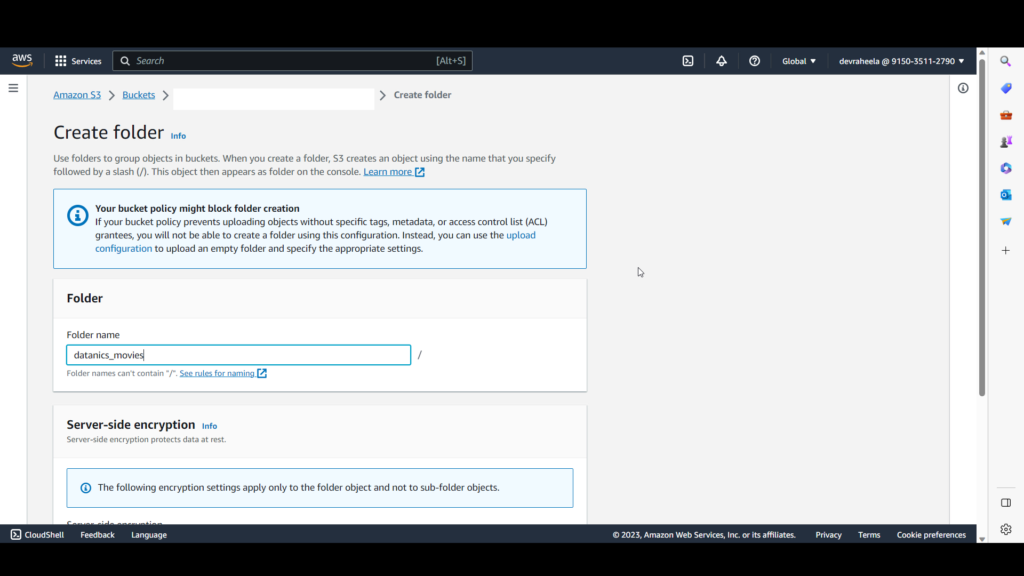
- Bucket name: enter a name similar to datanics_movies. The name must be unique, so you may need to use a variation. Record your bucket name.
- Region: set to the same region you selected in #1 above.
- At bottom, click Create bucket.
Step 2: Upload Training Data
In this step you’ll upload training data to S3 for Amazon Personalize to ingest. Personalize needs a fair amount of data in order to perform its function (at least 1000 user interactions). The data is movie titles and ratings data from MovieLens, a movie recommendation service.
- Download the Watch.csv for this project.
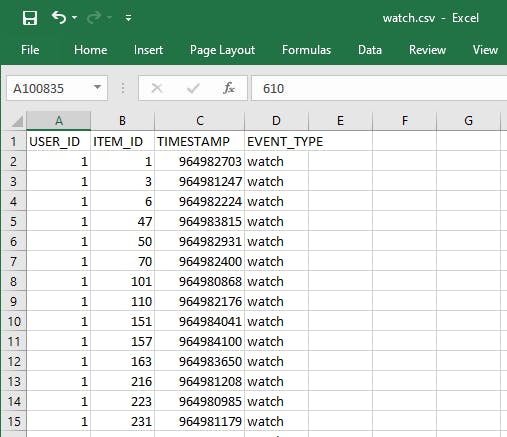
- Take a moment to view the watch.csv file. This data captures which movies were watched by users, which will drive viewing recommendations. In it, you see columns USER_ID, ITEM_ID, TIMESTAMP, and EVENT_TYPE. These are the fields Personalize will expect for video training data.
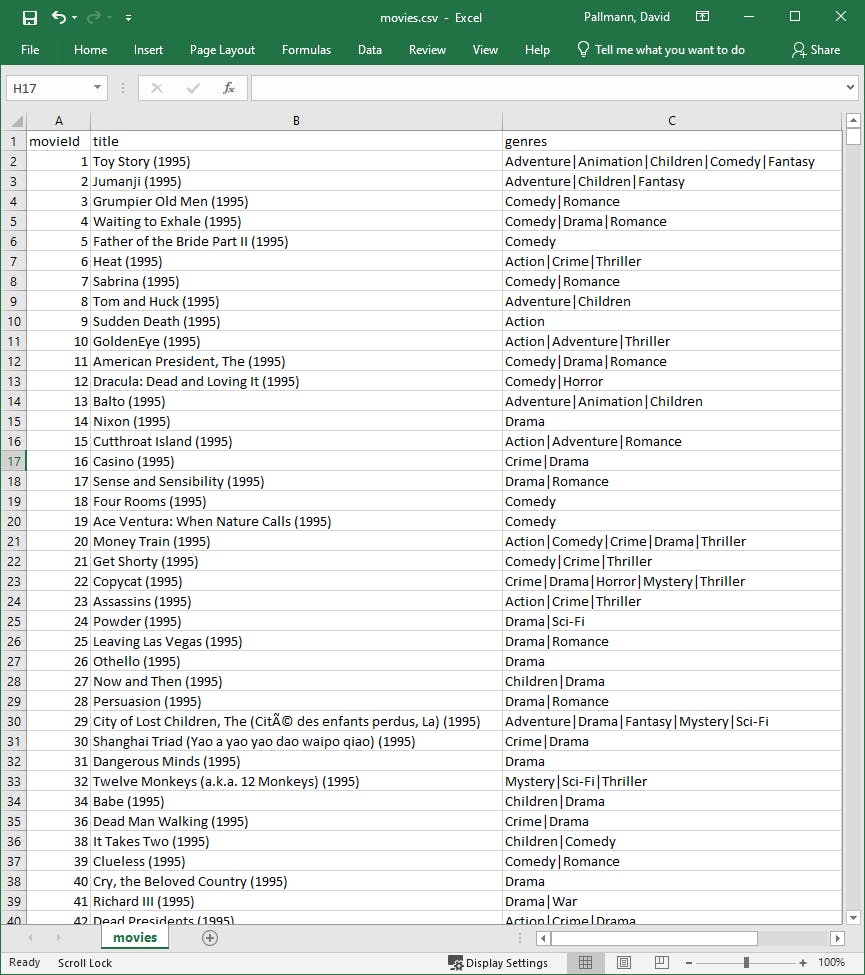
If you view movies.csv that you’ll see how item IDs relate to movie titles and genres.
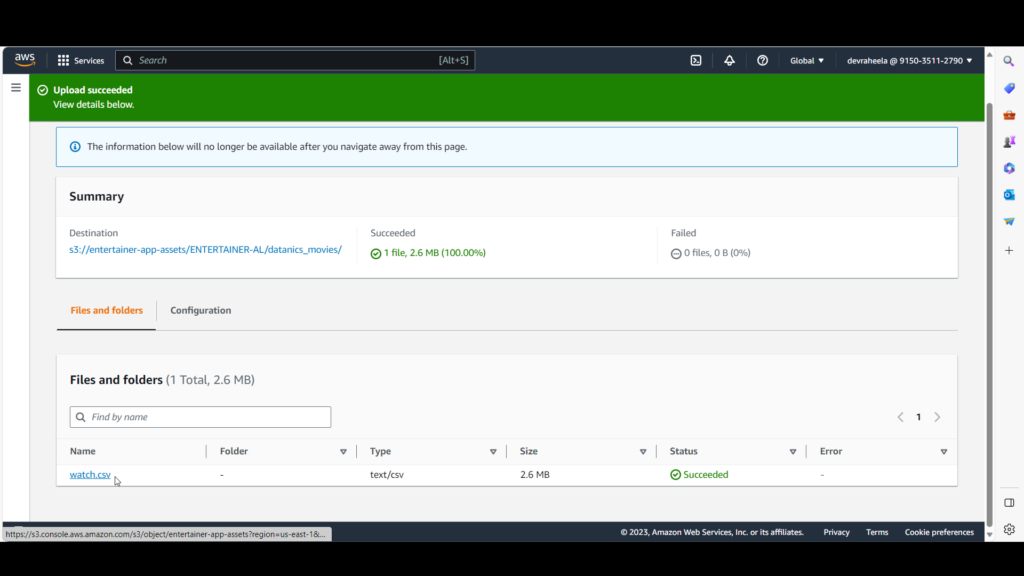
In the AWS console, navigate to Amazon S3 and upload the data file to your S3 bucket:
A. Select Buckets / Folder.
B. Find and select your S3 bucket.
C. Click Upload and Add Files, and upload file watch.csv.

Next, we’ll create a Dataset Group in Amazon Personalize with the training data.
A. Navigate to Amazon Personalize and select Create dataset group from the left panel.
B.C. For Name, we enter datanics_movies.
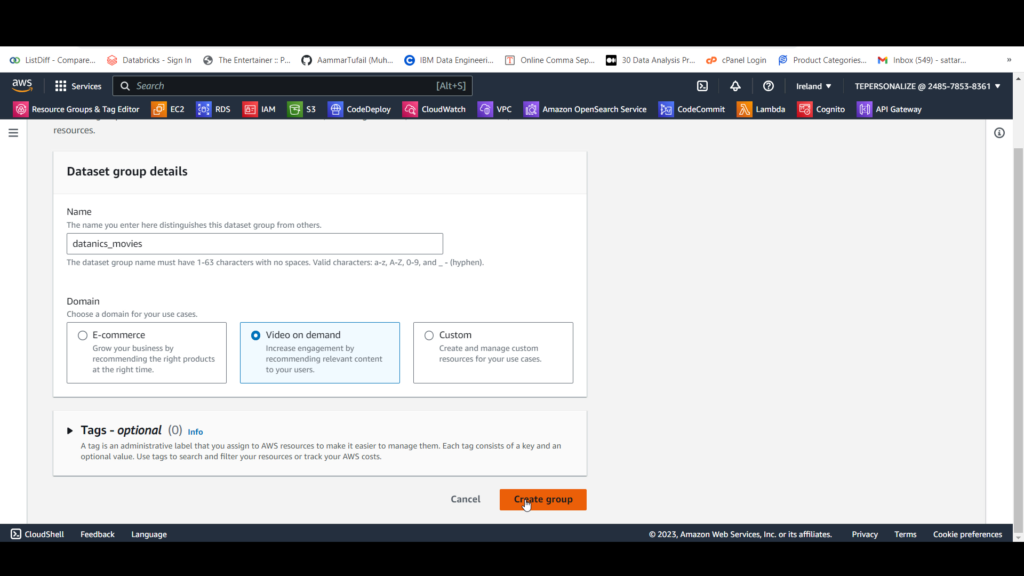
D. For Domain, select Video on demand. This matches the schema of our CSV data file.
E. Click Create group.

On the Create interactions dataset page,
On the Import interactions data page,
For Data import method, select Import data directly into Amazon Personalize datasets and Next.

B. For Dataset name, enter watch.
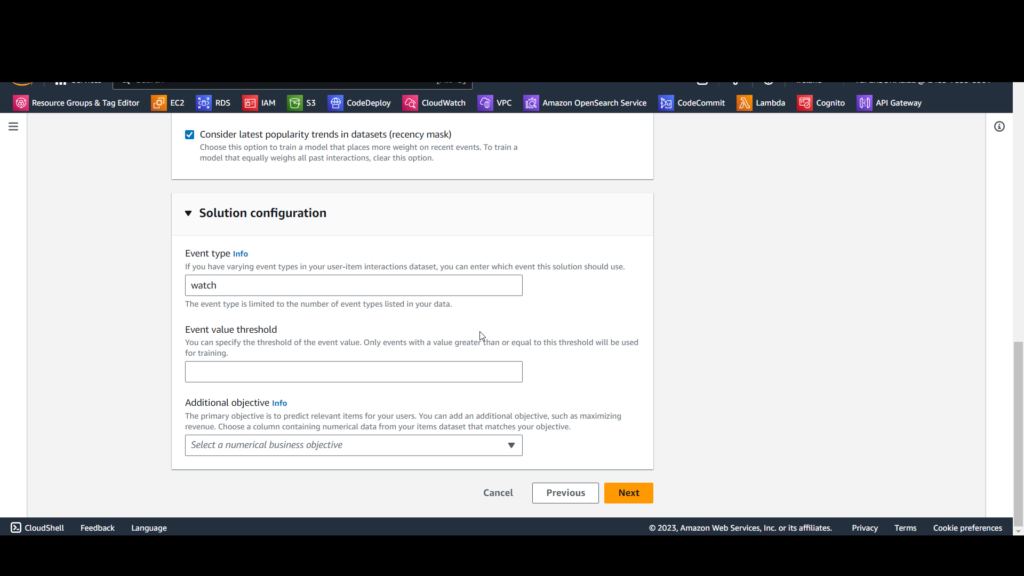
For Dataset schema select “Create a new domain schema by modifying existing default schema for your domain”
For Schema name enter watch_schema
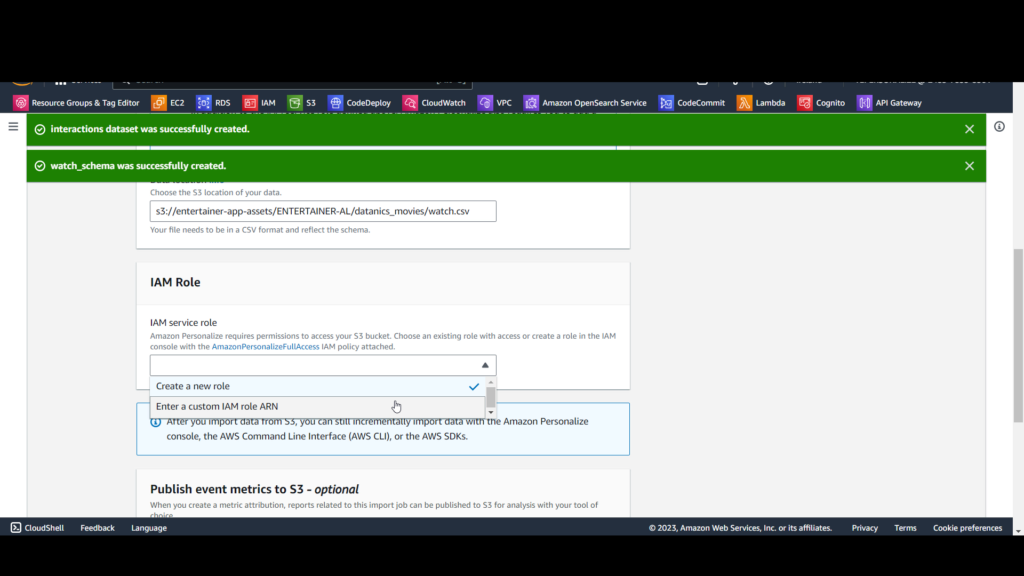
C. For Data location, enter s3://[bucket-name]/watch.csv, replacing [bucket-name] with the name of your S3 bucket. Ours is s3://hello-personalize/watch.csv.
D. For IAM service role, select Enter a custom IAM role ARN and enter the Amazon Resource Name (ARN) of the personalize-service role you created earlier, which will have this format: arn:awsiam::[account-id]:role/[role-name].
E. Click Finish.

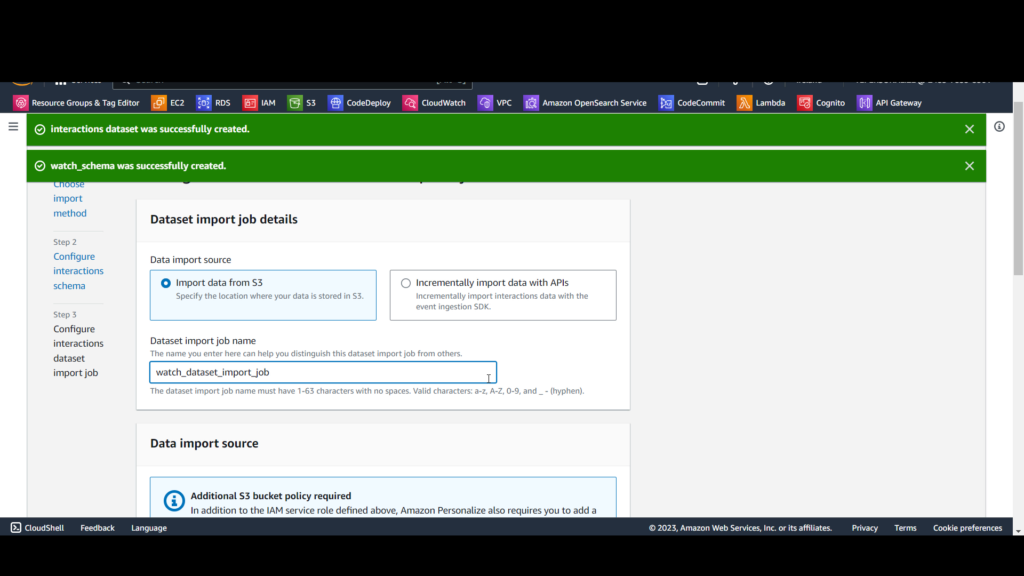
On the interactions dataset import job page,
A. For Data import source, select Import data from S3.
B. For Dataset import job name, enter watch_dataset_import_job.
C. For Data location, enter s3://[bucket-name]/watch.csv, replacing [bucket-name] with the name of your S3 bucket.
D. For IAM service role, select Enter a custom IAM role ARN and enter the Amazon Resource Name (ARN) of the personalize-service role you created earlier, which will have this format: arn:awsiam::[account-id]:role/[role-name].
E. Click Finish.
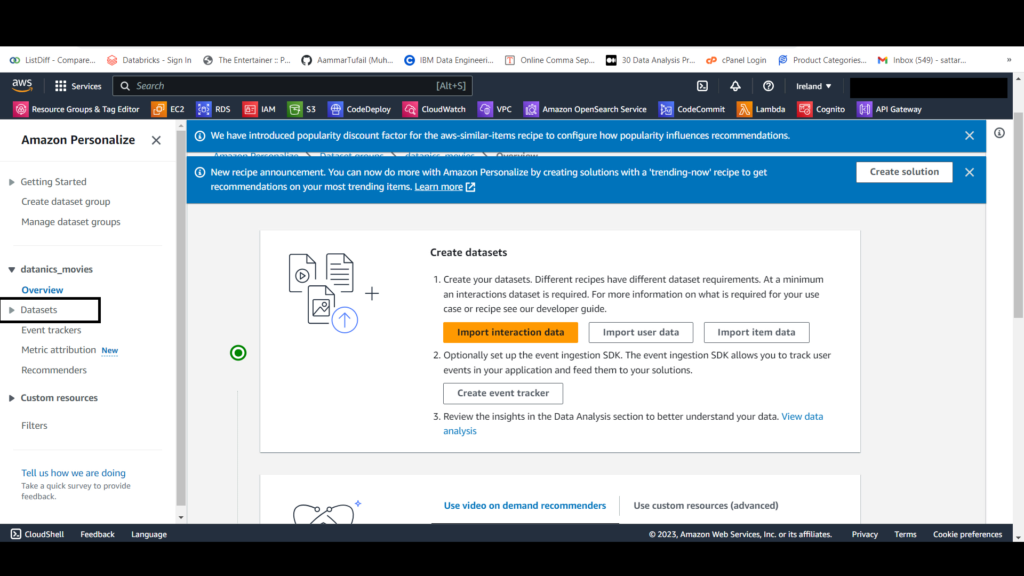
You’ll see a confirmation that your data is being imported. Refresh the page periodically until you see Interaction data active.
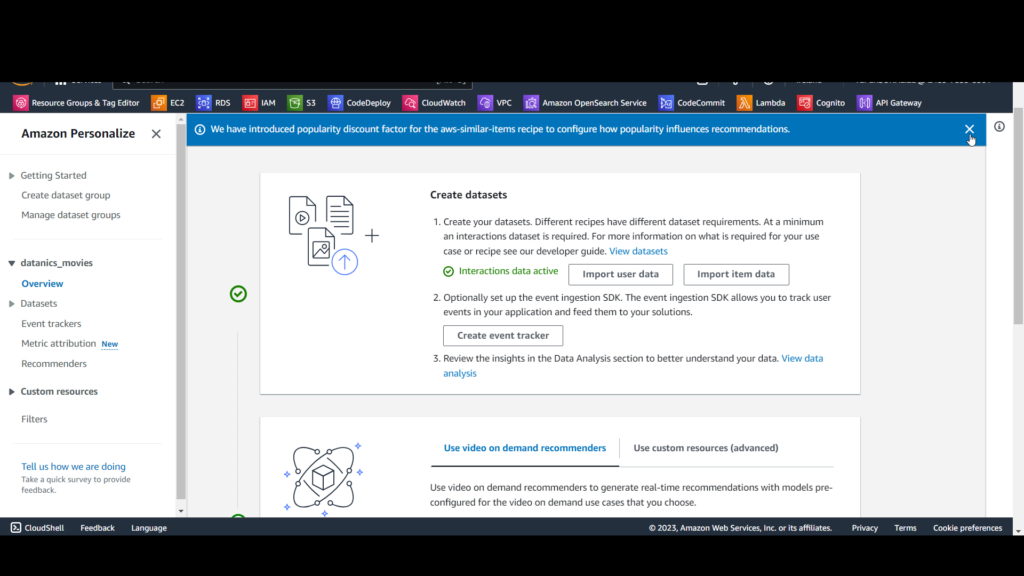
Amazon Personalize has now imported your movie watch data.
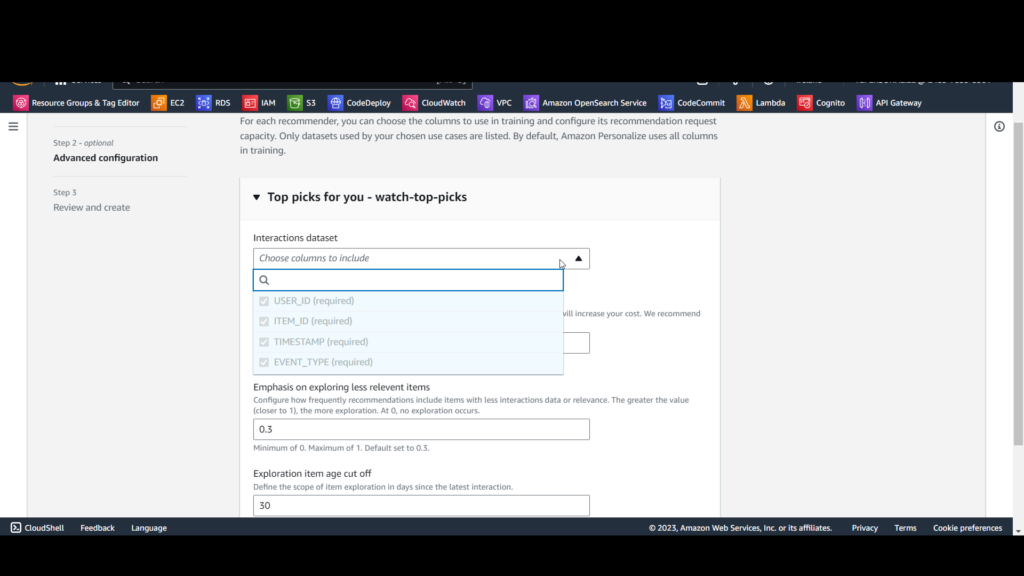
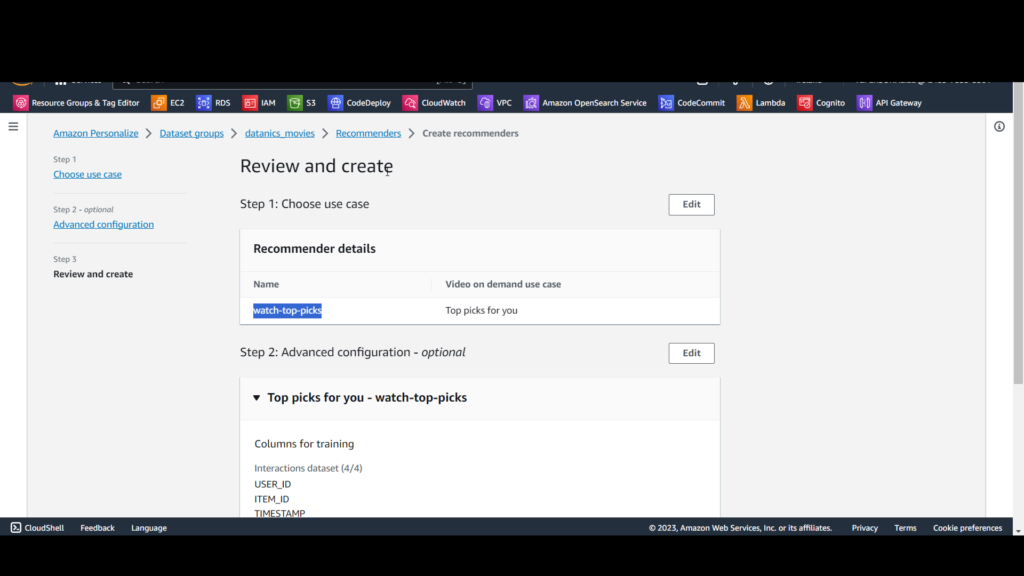
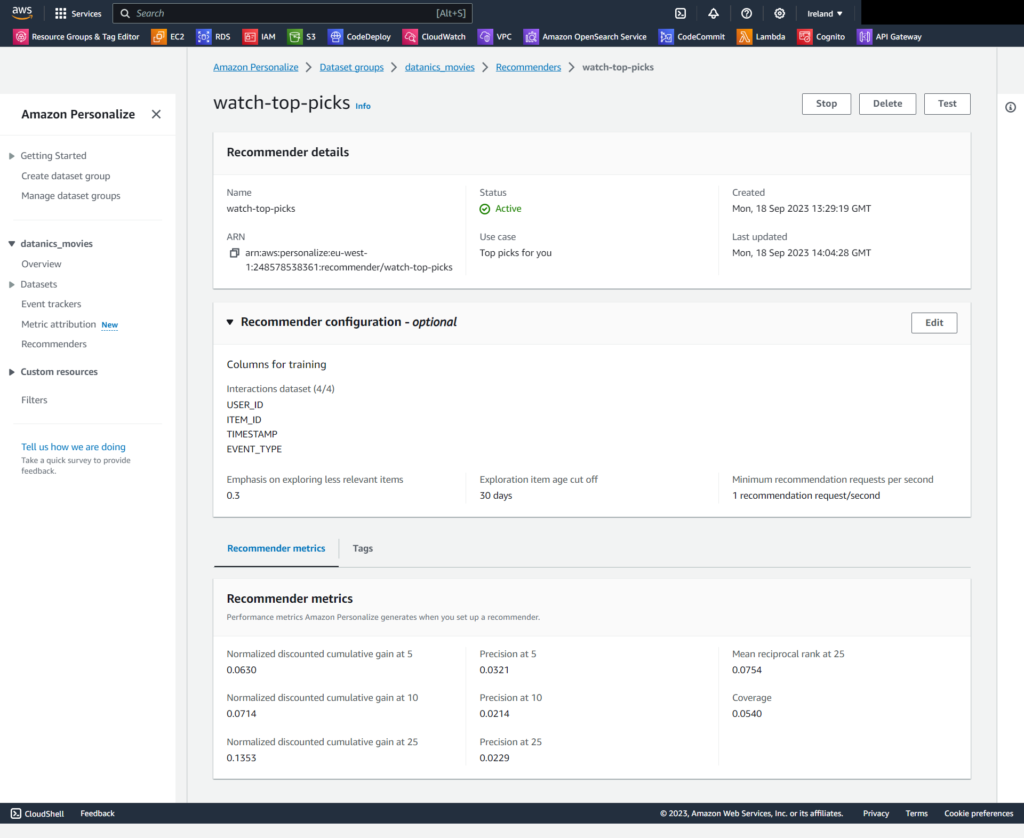
Step 3: Create a Recommender
In this step, you’ll create a recommender, which can suggest top picks for a user.
- In the AWS console, you should still be in Amazon Personalize on the Overview page from the prior step. If not, navigate to Amazon Personalize > Dataset groups > datanics_movies > Overview.
- Select the Use video on demand recommenders option and click Create recommenders.
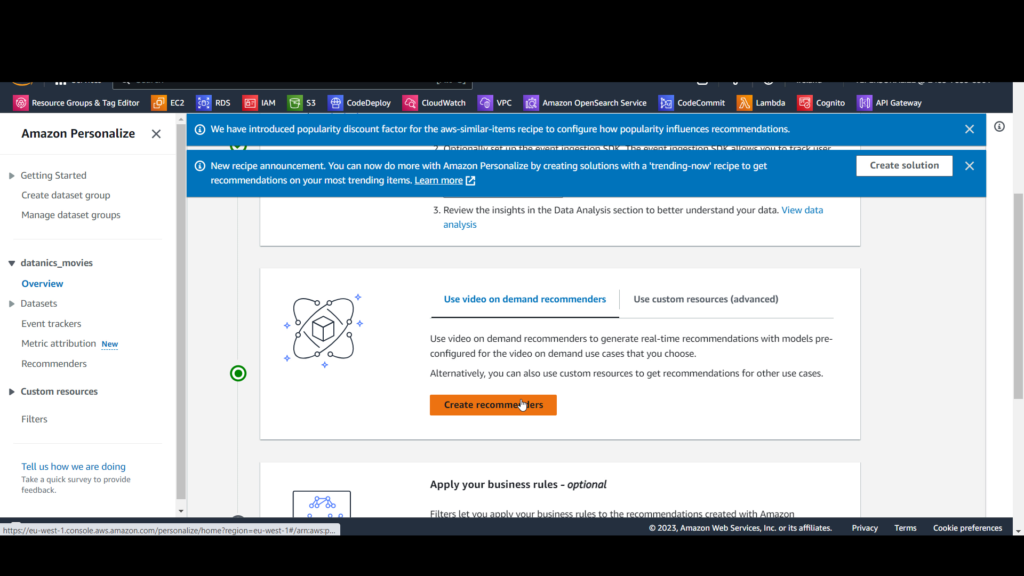
On the Create recommenders page, you’ll see a variety of built-in recommenders for video. We’re going to create a “top picks” recommender.
A. check Top picks for you and uncheck the other choices.
B. For Recommender name, enter top-picks.
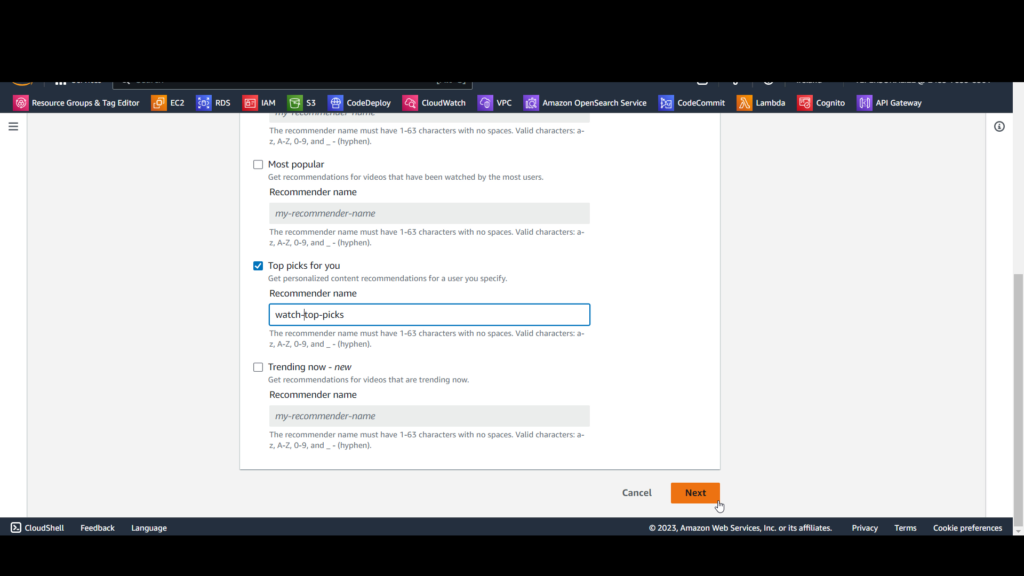

Click Create recommenders.
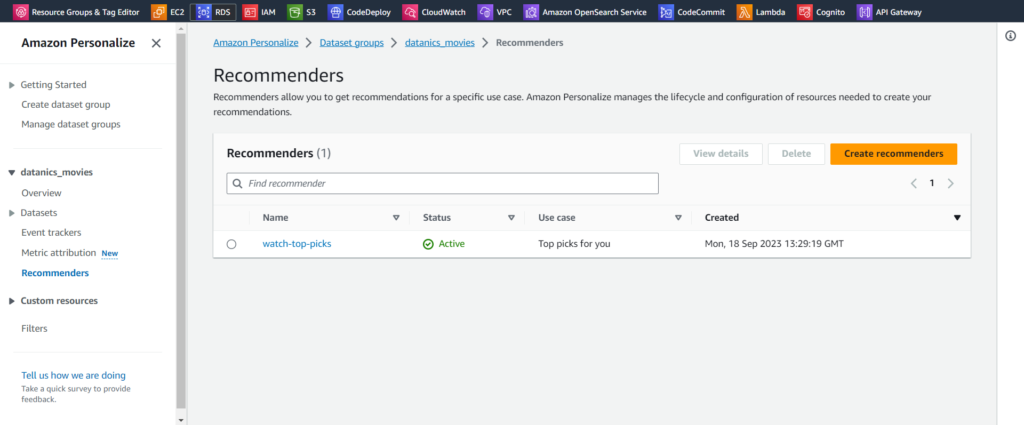
On the Recommenders page, watch the status, refreshing the page periodically. Wait for the status to reach Active. Creating the recommender may take a few minutes. This is a good time for a bio break.
Step 4: Create a Solution, Event Tracker, and Campaign
After all that configuration and training, we’re ready to publish our top picks recommender so we can use it in an application. To do that we’ll need to create 1) a solution, 2) a solution version, 3) an event tracker, and 4) a campaign.
- Create a solution:
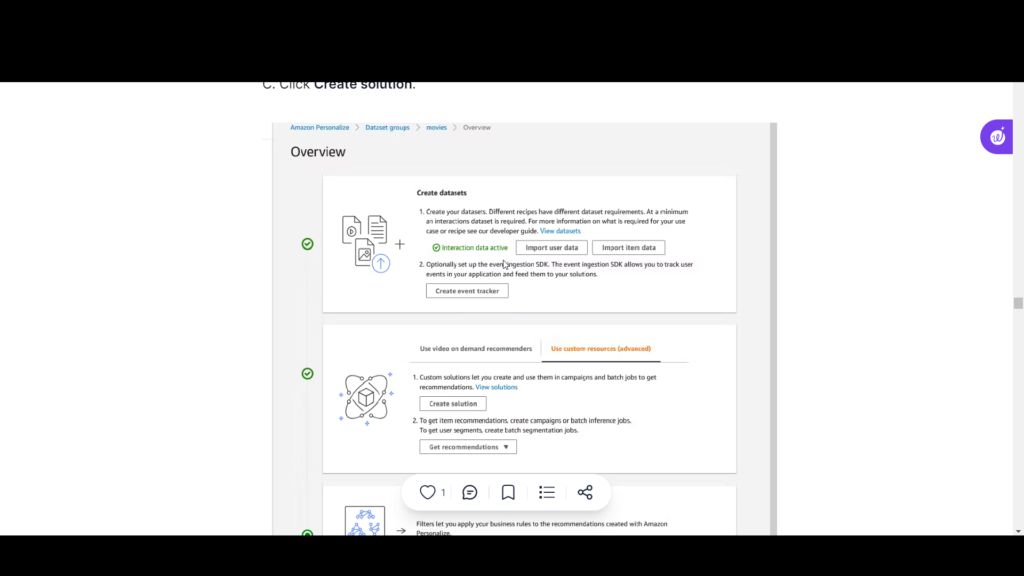
- In the AWS console, navigate to Amazon Personalize > Dataset groups > datanics_movies > Overview.
- On the middle pane, select the User custom resources (advanced) tab.
- Click Create solution.
On the Create solution page, set Solution name: watch_movie_solution.
Solution type: select Item recommendation.
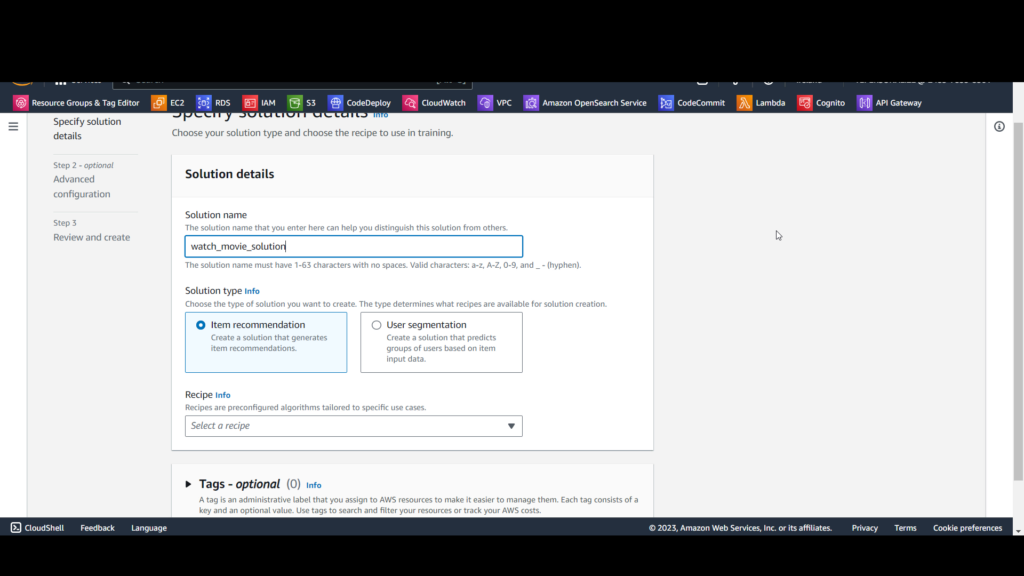
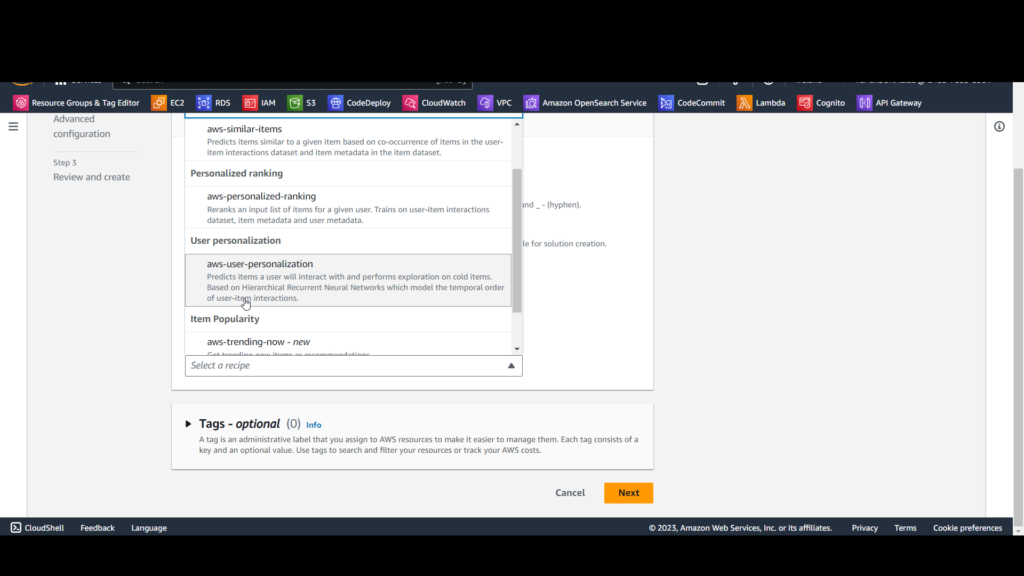
Recipe: select aws-user-personalization.
Click Next
Click Create solution version and confirm the prompt by clicking Create solution version.
C. Review the Create solution version page and record the Solution ARN and Latest Solution Version ARN. Then click Create solution version.
D. On the top-picks solution page, you see the solution version being created. Wait for solution training and creation to complete, which may take some minutes, You will see a status of Active when the solution version is ready. Note your solution version ID. Ours is 1bbe77cf.
One Reply to “What is Amazon Personalize?”
Leave a Reply
Related Posts
Exploring the Essential Data Storage Types: A Guide for Success
In today's data-driven world, understanding how data is stored is…
What is ACID in Databases ?
Atomicity: Imagine you're transferring money between accounts. If the transfer…
Exploring Spark Structured Streaming in Databricks: A Comprehensive Guide
Are you intrigued by the potential of Spark Structured Streaming…
Hi, this is a comment.
To get started with moderating, editing, and deleting comments, please visit the Comments screen in the dashboard.
Commenter avatars come from Gravatar.